The dress pattern is here. I didn't use a pattern for the hat and booties. As usual these items will be donated.


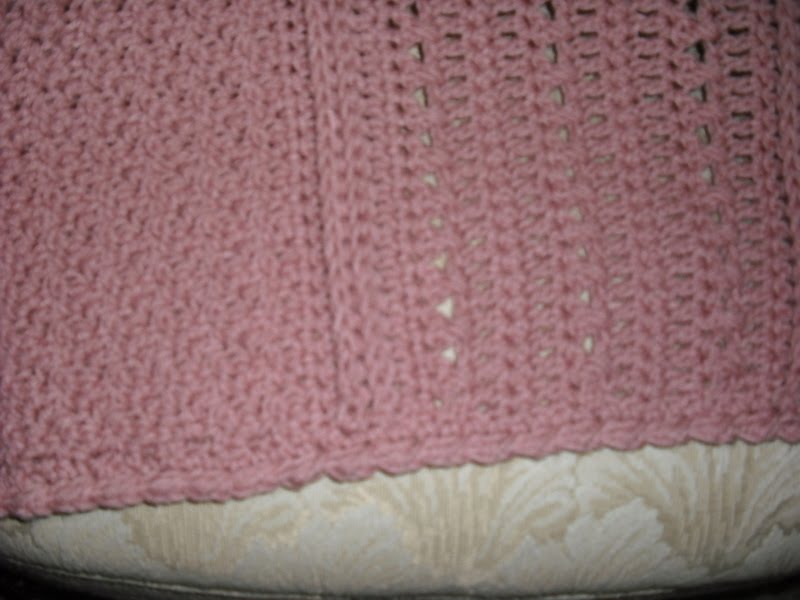


This is a relatively easy blanket, which I think should be achievable by an advanced beginner. It takes a little practice to get proficient at the crossed doubles, (mostly just figuring out which is the next stitch to skip, since the crossed Dc pulls the stitches that they have been worked into, close together), but once you get it, they are easy.
This blanket can be adapted to be a full size afghan or it can be made smaller. See end of pattern for some ideas on how to change the size.
Gauge: unimportant
I crochet somewhat loosely. My blanket will be about 42 inches square.
Materials:
WW yarn, (I used 26-28 oz of yarn.)
Crochet hook size K
Yarn needle for weaving in ends
Any yarn will work, just use an appropriately sized hook, size will vary with yarn used.
Stitches used:
St-stitch
ch-chain
sc-single crochet
dc-double crochet
Crossed doubles
fpdc-Front post double crochet (instead of working into the top of the dc in the previous row, you work around the post of the stitch from the front of it)
bpdc-Back post double crochet (same as above, but you are working the stich from the back of the post of the dc from the previous row)
Front and back post stitches form what I call “fake cables” or ridges on the front of your work. I like them because they are an easy way to add some texture and interest to crocheted fabric.
Note that all rows will have 120 stitches in them. The afghan is made in one piece. However, I have divided the pattern into sections to make it a little easier to keep track of. Do not end off at the end of a section, keep crocheting onto the next one. The afghan is made as follows:
section 1, section 2, section 1, section 2, section 1.
Pattern:
Chain 121.
Section 1:
Row 1: sc in second chain from hook and in each chain across. (120 sc) this is the right side)
Row 2: ch 2 (always counts as first dc), dc in each stitch across.
Row 3: ch 2, bpdc in each st across until you reach the turning ch, dc into top of turning ch
Row 4: ch 2, fpdc in each st across until you reach the turning ch, dc into top of turning ch
Row 5: ch 2, dc in each st across, last stitch will be into the top of the turning ch
Row 6: Ch 2, * skip a stitch, dc into the next stitch. Now, working around the stitch you just made, dc into the skipped stitch. (your crochet hook will be in front of the dc you just made)* (These two stitches made one set of crossed doubles) repeat from * to * until you get to the turning chain. Dc into the top of the turning chain.
Row 7: Repeat row 2, finishing with a dc in the top of the turning chainrow)
Row 8: ch, sc in each st across, finishing with a sc in top of turning ch
Row 9. Repeat row 7. (it’s a DC row)
Row 10: Repeat row 6. (crossed doubles)
Row 11 –13: Repeat rows 7 to 9.
Row 14: Repeat row 6. (crossed doubles)
Row 15: Repeat row 8. (sc row)
Row 16: repeat row 2. (double crochet row)
Row 17: repeat row 3. (bpdc row)
Row 18: repeat row 4 (fpdc row)
Row 19: repeat row 8 (sc row)
Section 2:
Rows 20-32: ch 1, sc in first st, dc in next st, *sc in next st, dc in next st * repeat from * to * to end of row (end this section with a wrong side row)
The rest of the afghan is repeats of the previous sections.
Rows 33-51: repeat section 1
Row 52 to 64: repeat section 2
Rows 65-81: repeat section 1
Do not cut yarn. Work a sc border all around the blanket, placing 3 sc into each corner and spacing stitches evenly across the ends of the rows. I try to make the same number of stitches in each end, so that the finished blanket turns out nice and even. I finished with a row of reverse HDC. (*HDC in a stitch, ch 1, skip a stitch* and repeat from *to*) worked all around but from left to right, rather than the usual right to left. This makes a nice rope like border.
This blanket can easily be made larger or smaller. Start with an even number of sc in the first row.
To make it wider, you could either add panels, add more rows to section 2, add some extra rows into one of the panels, or make up additions of your own.
I purposely didn’t add any very lacy stitches, because I wanted the finished product to be suitable for either a boys or a girls blanket.


Shell Baby Booties
Size: sole is about 4 inches long
WW yarn
H hook
Ribbon (optional)
Stitches used:
Ch – chain
Ss – slip stitch
Hdc – Half double crochet
Dc – Double crochet
Sc – single crochet
Pattern:
Beginning chain counts as a stitch.
Round 1:
Ch 3, 7 HDC in 3rd ch from hook, join to top of beginning ch. (8 HDC)
Round 2:
Ch 2, Hdc in same st, 2HDC in each st around, join to top of beginning ch. (16 HDC)
Rounds 3 to 6:
Ch 2, Hdc in each st around. (16 Hdc)
Start working back and forth in rows. 4 stitches in the round will be left unworked.
Row 7:
Ch 2, Hdc in the next 11 stitches. (12 Hdc)
Row 8 and 9:
Ch 2, turn, Hdc in each st around (12 Hdc)
Row 10:
Ch2, turn, Hdc in next st, HDC 2 together 4 times, Hdc in last 2 stitches (8 HDC)
Now you will again work in rounds.
Round 11:
ch 1, turn.
You will be working along the ends of the rows just completed.
Make 6 sc evenly spaced across the ends of rows 7 to 10.
Sc in the 4 stitches left unworked from round 6, then make 6 more sc evenly spaced along the other ends of rows 7 to 10.
Join with a ss to the first sc on the other side. You will have a bootie shape with a slit in the heel. (16 sc)
Round 12:
Ch 2, HDC in each st around Join with SS to top of beginning ch 2. (16 HDC)
Round 13:
(eyelet row)
Ch 3, skip a stitch, + Hdc in next st, ch 1, Skip a stitch + repeat from + to + around , join with SS to top of beginning ch (8 ch 1 spaces)
Round 14:
SS to a ch 1 space, ch 3, 2 dc in same space, make a 3 dc in each of the other ch 1 spaces, join with ss to top of beginning ch 3.
Fasten off, leaving a tail long enough to weave down to the slit in the heel and sew it up.
Weave in ends. Thread a length of ribbon through the eyelets, or make a crocheted chain to use for a tie.
These booties can be made smaller by omitting a round, or larger by adding a round or row. They can be made taller by adding a row of sc or another shell row at the end.

Shell Baby Hat
Size 3 to 6 months
Materials:
WW Yarn
Size G hook
Stitches Used:
Ch - chain
Ss - slip stitch
Hdc - half double crochet
Dc - double crochet
Shell – 3 dc in same space
Beginning ch of each round counts as a stitch.
Join each round with a ss in top of the beginning chain.
Round 1:
Ch 4, 11 Dc in 4th ch from hook, join with ss to top of beginning ch. (12 DC)
Round 2:
Ch 3, Dc in same st , 2 dC on each st around., join with ss to top of beginning ch 3 (24 DC)
Round 3:
Ch 3, + 2 Dc in next st, DC in next st + repeat from + to+ , 1 more Dc in same st as beginning ch 3, join with ss to top of beginning ch 3. (36 DC)
Round 4:
Ch 3 and Dc in each st around, join with SS in top of beginning ch 3. (36 DC)
Round 5:
(this row still increases the diameter of the hat.)
SS to next st, ch 3, 2 more DC in same st, + skip a stitch, 3 DC in next st +, repeat from + to + around, join with SS in top of beginning ch 3. (18 shells, each with 3 DC)
Round 6 to 12
SS to the center st of the next 3 DC group, do 3 DC in center stitch of each shell around.
Round 13:
Ch 2, HDC in next st and in each st around.
Fasten off.
Notes: You can easily make this hat bigger by adding some extra stitches in row 4.
Remember that row 5 increases the number of stitches again by 1/3, so don't add too many stitches. You need an even number of stitches in row 4 to make the pattern work.
You could also make the hat larger just by using a larger hook.
Add extra rows of shells to make hat taller.
If you want a turned up cuff add a few more rows of Hdc at the end.


