Showing posts with label neck warmer. Show all posts

Wednesday, November 30, 2011

Ribbed Neckwarmer

Ribbed Neckwarmer
Easy enough for beginners, once you master the front post double crochet stitch.  Don’t be intimidated by this if you are a beginner.  Front post stitches are easy, and really increase the effects you are able to get  with crochet.  This can probably be easily made in a couple of hours if you have a little crochet experience.

Here is a video link for the front post stitches.
This site has written instructions for many different crochet techniques, If you prefer written information.   You will have to scroll down a bit to find the front post instructions.

Materials:
WW yarn  ( I used Bernat Super Value Yarn in gray)
Size K hook
2 one inch buttons  (the buttons have to be able to fit into the holes between the stitches, so you may have to get smaller buttons if you crochet tightly)
yarn needle for weaving in ends)
sewing thread to match your buttons
needle for sewing the buttons on

Abbreviations:
HDC- half double crochet
FPDC- front post double crochet
FPHDC-front post half double crochet

Chain 92.  (make sure your chain is around 32 inches long for an average size neck.  You can make it longer or shorter depending on your preference.)

Row 1:  HDC in  3rd chain from hook and in each chain across.  (You should have 90 stitches, but it really doesn’t matter how many you have)

Row 2 through 13:  Chain 2, turn.  (Chain 2 counts as first stitch)  FPDC in each stitch until you get to the last stitch of the row, HDC into last stitch.)
You can continue this row until the neckwarmer is as wide as you would like it to be.

Row 14:  Chain 2, turn, FPHDC into each stitch.  (Doing HDC for the last row, makes the stitches a little shorter and makes the last row match the first one in width.)

Fasten off, weave in ends.

Put neckwarmer around your neck and decide where you want the buttons to be.  Sew on buttons and enjoy!
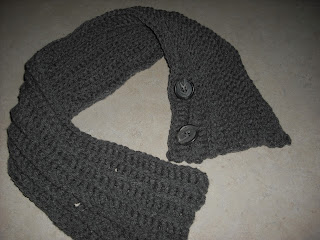


 Pattern is untested, except by myself. Please let me know if something is unclear, or you find a mistake.
You may sell one or two items made from this pattern, but you may not sell the pattern or publish it anywhere else. Please link to the pattern if you post a picture elsewhere.

Monday, December 22, 2008

Snowy Day Moebius Neckwarmer/Hood


Snowy Day Moebius Neckwarmer/Hood

I like the concept of a moebius strip, kind of a circle without an end, so a few years ago I made a moebius shawl. I started to make a moebius scarf this year, and it turned into this.

This pattern will work with any hook size and yarn.

I used 2 skeins of Red Heart Soft yarn and a J hook.

Stitches used:

Ch (chain)

Sc (single crochet)

Dc (double crochet)

Pattern:

Chain an even number of stitches. The chain should fit around your face loosely if you want to use it as a hood as well.(My chain was about 32 inches long.) If you just want a neck warmer, make a chain that fits comfortably over your head, or even larger if you want a looser cowl.

Join the ends of the chain together with a ss, being careful not to twist the chain.

Row 1: Chain 3, sc in same chain as joining, skip a stitch, + dc, sc both in next chain, skip a chain+ repeat from + to+ until you get back to where you started. Last chain should be unworked. Skip that chain and turn the work so that you can continue the pattern in the other side of the foundation chain. Continue in pattern +dc, sc both in same chain, skip a chain+ until you get back to the first ch 3. You should have one chain left unworked at the end. Skip that chain and join with a ss to the beginning ch 3.

You have worked one row, but it will look like you have done two rows because you have worked into both sides of the foundation chain. The turn creates the twist. After a few rounds you should clearly see a twist developing, although it should be apparent right away.

Row 2 and following: Ch 3 and turn. (you will be working in the opposite direction from the last row.) sc in same stitch as beginning ch 3, skip a stitch, +dc, sc both into next stitch, skip a stitch+ repeat from + to + until you get back to beginning ch 3. Join to top of ch 3 with a ss. Again you have worked around both sides of the neckwarmer.

Turn and work in the opposite direction for each row. All stitches are worked into the DC’s of the previous row, and the sc’s are always skipped.

Continue with row 2 until the neckwarmer is the size you want it to be. You can make this just big enough to be a neck warmer or you can make it longer and pull it up over your head as a hood.

I finished mine with a row of single crochet, but this is optional.

My 20 year old daughter suggested that this would make a nice accessory worn with a sweater.

If you made this larger it would work as a cowl, or still larger and it could be a shawl or capelet.

You can make this with other stitch patterns, as long as they are reversible. Half of your stitches will be upside down in the finished item. Some stitch patterns won’t require you to turn your work at the end of every row, and you can just keep working in the same direction.


For this fit, I started with a chain about 32 inches long, approximately 170 chains the way I crochet. Mine is about 14 inches in height, which is where I ran out of yarn. If you just want it for a scarf, 7 inches is ample.

Pattern is untested, except by myself. Please let me know if something is unclear, or you find a mistake.
You may sell one or two items made from this pattern, but you may not sell the pattern or publish it anywhere else. Please link to the pattern if you post a picture elsewhere.