Wednesday, November 30, 2011

Ribbed Neckwarmer

Ribbed Neckwarmer
Easy enough for beginners, once you master the front post double crochet stitch.  Don’t be intimidated by this if you are a beginner.  Front post stitches are easy, and really increase the effects you are able to get  with crochet.  This can probably be easily made in a couple of hours if you have a little crochet experience.

Here is a video link for the front post stitches.
This site has written instructions for many different crochet techniques, If you prefer written information.   You will have to scroll down a bit to find the front post instructions.

Materials:
WW yarn  ( I used Bernat Super Value Yarn in gray)
Size K hook
2 one inch buttons  (the buttons have to be able to fit into the holes between the stitches, so you may have to get smaller buttons if you crochet tightly)
yarn needle for weaving in ends)
sewing thread to match your buttons
needle for sewing the buttons on

Abbreviations:
HDC- half double crochet
FPDC- front post double crochet
FPHDC-front post half double crochet

Chain 92.  (make sure your chain is around 32 inches long for an average size neck.  You can make it longer or shorter depending on your preference.)

Row 1:  HDC in  3rd chain from hook and in each chain across.  (You should have 90 stitches, but it really doesn’t matter how many you have)

Row 2 through 13:  Chain 2, turn.  (Chain 2 counts as first stitch)  FPDC in each stitch until you get to the last stitch of the row, HDC into last stitch.)
You can continue this row until the neckwarmer is as wide as you would like it to be.

Row 14:  Chain 2, turn, FPHDC into each stitch.  (Doing HDC for the last row, makes the stitches a little shorter and makes the last row match the first one in width.)

Fasten off, weave in ends.

Put neckwarmer around your neck and decide where you want the buttons to be.  Sew on buttons and enjoy!
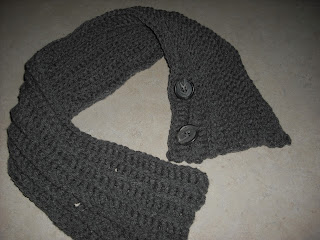


 Pattern is untested, except by myself. Please let me know if something is unclear, or you find a mistake.
You may sell one or two items made from this pattern, but you may not sell the pattern or publish it anywhere else. Please link to the pattern if you post a picture elsewhere.

Friday, November 4, 2011

Coasters

Directions for coasters made from ceramic tiles are all over the internet.  Michelle and I made these using 4 inch tiles from Menards, (11 cents each), a jar of Mod-Podge and a few sheets of scrapbook paper.  The backs of the tiles are rough so we glued on some squares of vinyl to finish them off.  Cork or felt would be a good way to finish the backs as well.  I sprayed the finished product with clear acrylic finish, but I don't know if it was necessary.

 I made these, all from the same sheet of paper.

Michelle made this set, using 4 different sheets of paper.  I like these a lot better than mine, especially that one on the bottom right.

Wednesday, October 19, 2011

Finished another one of those projects!

Last year I started a quilted purse, but after I got part of it finished, I couldn't figure out how to finish it.  I designed this myself and should have done some planning before starting to cut and sew.  However, it is finally finished, even though it didn't turn out at all like I had planned.

Saturday, October 15, 2011

Through my kitchen window: A Pileated Woodpecker

Andy and I were both in the basement the other day when we heard a loud thud from upstairs.  It sounded like something had fallen up there.  Andy went to check it out, and called for me to come and see what it was.  This bird was pounding at the porch post.  It's a pileated woodpecker.   I think I've heard them in the woods from time to time, but I've never seen one before. 


Thursday, October 13, 2011

Autumn Beauty

For a week or so we have been enjoying beautiful summer like weather here.  Today it is cool and fall like, but before the weather changed we went over to the "Pickerel Lake-Fred Meijer Nature Reserve" to walk around the lake and enjoy the beautiful fall colors.  This is one of my favorite places to walk,  It's gorgeous in any season, but fall really shines here.
We walked around the lake, but there are other trails as well.


 The first thing we noticed were these three swans hanging around next to the boardwalk.   They were evidently posing for pictures.


Wednesday, October 12, 2011

Giveaway from Jenny of Elefantz'blog

Check out this fun giveaway from Jenny, celebrating 1500 followers.


Tuesday, October 4, 2011

Fall Getaway

A few weeks ago Andy and I spent a few days up in the UP and in Northern Ontario.  We took the Agawa Canyon train trip and then spent a few days driving around the UP.  The train trip was fun, but it was a little early for good fall color, which was a bit of a disappointment.


We had planned to visit Mackinac Island while we were up there, but it was really too cold for a trip to the island.  Instead we went to Tahquamenon Falls and visited a few lighthouses.


                                                  Old Mission Point Light House


                                               A couple of shots in Tahquamenon Falls State Park


                                                       Old Makinac Point Light House


                                                     McGulpins Point Light House