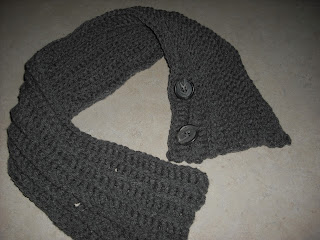
Easy enough for beginners, once you master the front post double crochet stitch. Don’t be intimidated by this if you are a beginner. Front post stitches are easy, and really increase the effects you are able to get with crochet. This can probably be easily made in a couple of hours if you have a little crochet experience.
Here is a video link for the front post stitches.
This site has written instructions for many different crochet techniques, If you prefer written information. You will have to scroll down a bit to find the front post instructions.
Materials:
WW yarn ( I used Bernat Super Value Yarn in gray)
Size K hook
2 one inch buttons (the buttons have to be able to fit into the holes between the stitches, so you may have to get smaller buttons if you crochet tightly)
yarn needle for weaving in ends)
sewing thread to match your buttons
needle for sewing the buttons on
Abbreviations:
HDC- half double crochet
FPDC- front post double crochet
FPHDC-front post half double crochet
Chain 92. (make sure your chain is around 32 inches long for an average size neck. You can make it longer or shorter depending on your preference.)
Row 1: HDC in 3rd chain from hook and in each chain across. (You should have 90 stitches, but it really doesn’t matter how many you have)
Row 2 through 13: Chain 2, turn. (Chain 2 counts as first stitch) FPDC in each stitch until you get to the last stitch of the row, HDC into last stitch.)
You can continue this row until the neckwarmer is as wide as you would like it to be.
Row 14: Chain 2, turn, FPHDC into each stitch. (Doing HDC for the last row, makes the stitches a little shorter and makes the last row match the first one in width.)
Fasten off, weave in ends.
Put neckwarmer around your neck and decide where you want the buttons to be. Sew on buttons and enjoy!
Pattern is untested, except by myself. Please let me know if something is unclear, or you find a mistake.
You may sell one or two items made from this pattern, but you may not sell the pattern or publish it anywhere else. Please link to the pattern if you post a picture elsewhere.
Pattern is untested, except by myself. Please let me know if something is unclear, or you find a mistake.
You may sell one or two items made from this pattern, but you may not sell the pattern or publish it anywhere else. Please link to the pattern if you post a picture elsewhere.


